Replacing the 12 volt battery in a 2007 Camry Hybrid
Update November 2019
Now 6 years after replacing the my 2007 Camry Hybrid 12 volt battery with Sears DieHard AGM battery it was still
working fine. As when I replaced the orginal Panasonic battery that came with the car, I felt that the Sears battery
was past due for replacement. I was more interested it avoiding a failure on the road, than seeing how long it might last.
Unfortunately, Sears no longer sells that model.
I didn't want to buy online due with no knoledge of the manufacture date as
well as added shipping costs.
Costco didn't have an AGM battery that would fit.
The local Batteries+Bulbs store could get anything if I was willing to pay more than $200.
Then I checked Sam's Club website that showed a wide selection of Duracell branded AGM batteries at reasonable prices.
The lowest priced AGM battery was a Group Size 75/86 model.
At $110.85 it was $30 less than the next lowest Group Size 34/78 battery that matched the old battery size.
I went to Sam's club to check it out. Sam's had it in stock, the size measured okay, and it was as fresh as it
could be with a manufacture date of the current month!
Of course I bought it.
Installation was easy as some of the steps below had already been done.
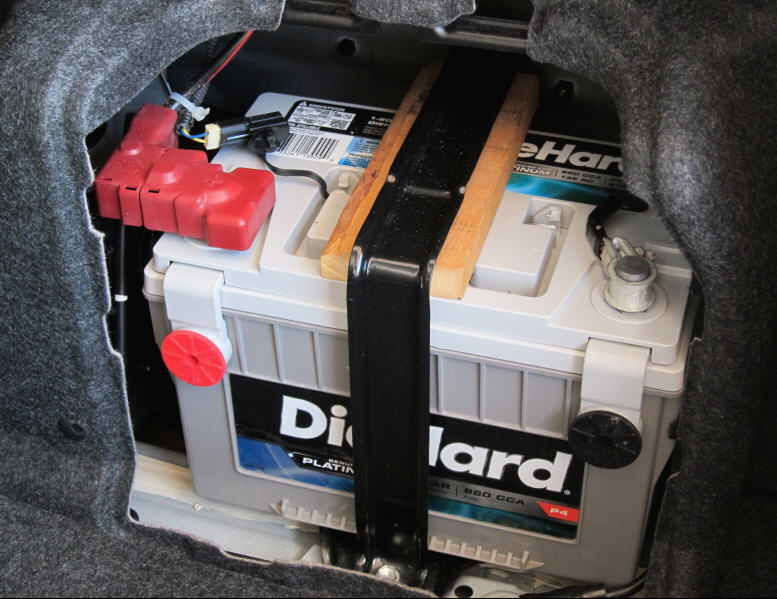
I used same 3/4 inch wood spacer that I'd used with the Sears battery.
The battery came with a loose plastic spacer grid on top for shipping.
Only when I was done, did I read the print on the plastic spacer that said it could be under the battery for
better fit if needed. I expect it would have used it instead of my wood spacer.
dropping things...
CHECK HYBRID SYSTEM warning.
(This was written in December 2013. As of July 2015, I'm still 100% satisfied with the results.)
We don't hear much about 12 volt battery replacement
in Camry Hybrids.Ā After six and a half
years I decided it was past time to replace the 12 volt battery in my 2007 even
though it wasn't showing any signs of failure.
Previous research indicated the Optima D35 Yellow top
battery, part number 8040-218, would be a good choice.
More recently, I found the Sears
DieHard Platinum, Group Size 34/78DT, model 51090 (a.k.a 50090), which
appears to be made by Odyssey. See http://www.odysseybattery.comĀ-Ā
Many prefer Odyssey to Optima and the Sears branded version is available
at a lower price then the Odyssey brand.
The Optima D35 technically isn't a
"reverse terminal" battery but the terminals are not well-placed for
our use.Ā The Sears terminal placement is
essentially the same as the original battery.
I was surprised that my local Sears store had a fresh
(current month) battery in stock.Ā I paid
$207 plus tax and kept the old battery rather than getting a $15 credit.
There are three installation issues with the Sears battery
(and likely with the Optima as well): no hydrogen gas vent tube, no thermal
sensor, and somewhat different size.Ā The
gas vent tube on the original battery prevents hydrogen gas buildup in the
trunk in overcharge conditions.Ā
Aftermarket batteries don't have this tube-connected vent.
From what I've read, the risk of excess
hydrogen gas from a sealed battery in the Camry trunk is very small and is
commonly ignored.Ā I agree. While I don't understand the need for the
thermal sensor, it may use battery temperature as an indication of
overcharging.Ā I wanted to preserve the
sensor.Ā Lastly, we have to deal with the
battery size differences.
Installation steps: (Scroll down for photos.)
- Write
down your radio station settings as they will be lost when the battery is
disconnected.Ā Most other settings
appear to be preserved.Ā (I decided
not to try to use a small battery to preserve the settings in order to
eliminate any safety or damage risk this might introduce.)Ā
- Close
all the car doors, leaving them unlocked.Ā
Leave the driver's side window down too, just in case there is a
problem with re-activating the wireless locking system.
- Disconnect
the negative battery connection followed by the positive connection.
These connections and all mounting bolts
are 10 mm.Ā It was easier to loosen
the negative connection with a socket wrench than an open end wrench.
If you can't loosen it, you may want to
pull the battery out a bit first.
- Remove
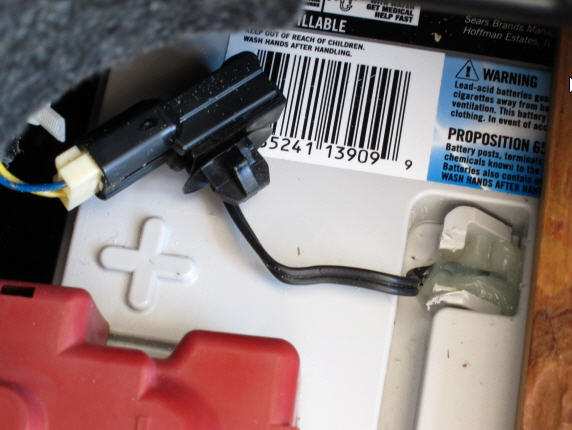
the battery hold-down clamp and pull the battery out far enough to
disconnect the wiring harness connector from the temperature sensor socket
that connects to the sensor inside the old battery.
- Disconnect
the thin hose from the battery vent and remove the battery.
- Pry
off the temperature sensor socket assembly from the old battery casing taking
care not to damage the thin black sensor wires leading into the
battery.Ā Peal back the label where
the sensor wires enter the battery until you see the white glue (silicone
rubber?) over the sensor.Ā Carefully
pry out the glue with a small screwdriver, taking care not to damage the
black plastic sensor body.Ā In my
case, the silicone rubber broke apart and separated cleanly from the
sensor body.Ā Set the sensor
assembly aside.Ā We'll install it
last so as not to disturb the curing glue.
- The
new battery is about a quarter or half inch too long to fit in the Camry' steel
battery base plate.Ā Remove the four
base plate bolts and bend the ends of the base plate down a bit, spreading
out the point of contact with the battery.Ā I found it essentially impossible to
bend the formed steel ends and simply bent the ends at the flat area where
they join the base.ĀBend the base
plate ends just enough so that the base plate lays flat on the battery
base with little or no end-to-end play.
- Reinstall
the base plate.
- The
depression the battery handle fits into is a good place to mount the
temperature sensor.Ā It's as close
to the battery cells as we can get and near the middle of the battery
top.ĀĀ Unfortunately, the handle is
in the way.Ā Cut the plastic holding
the handle at the hinges and discard the handle.
ĀĀ (I used a cutting disk with a Dremel tool, taking care not to nick or cut any other
plastic.)Ā Later, we'll glue the
temperature sensor in the handle storage depression.
- Slide
in the battery and see that it fits properly on the base. (This is a bit more awkward than you
might expect.Ā Try to hold the back
of the battery up as you place it in the base.)
- The
battery is about 3/4 inch too short for the hold-down clamp.Ā I cut a 7 inch long piece ofĀ 3/4 inch thick, 2 1/2 inch wide (nominal
1 by 3) pine board to use as a spacer.ĀĀ
Using this spacer, adjust the back clamp nut until the front clamp
bolt tightens with only enough clamp pressure on the battery to hold it
snug. Over tightening risks
distorting the battery casing.Ā Just
snug is tight enough.
- Plug
the temperature sensor into the wiring harness and leave it loose for
now.Ā Connect the positive, then
negative battery connections. Leave the trunk open.
- At
this point, you may want to see if you can get in the car as the wireless
remote system has been disabled by disconnecting the battery.
The manual says that the wireless remote
can be reactivated by pressing the button on a door (locking the doors?),
performing a remote operation, or by using the key to open the door. I didn't find it quite that simple and
was relieved that after a minute or two of fiddling the system started
working.Ā
- With
everything working, you can glue the temperature sensor in the battery
handle depression.ĀĀ While the
position isn't critical, I found the handle hinge seat on the positive end
of the battery to be a good location.Ā
You may want to remove the battery clamp and spacer for slightly
easier access and possibly tape down the sensor wire to hold the sensor in
position, preferably laying flat on the bottom of the depression.ĀUse a small amount of RTV silicone
adhesive flowing under and over the entire sensor.Ā (Silicone rubber probably has better
thermal properties than other glues and has the important benefit of being
relatively easy to remove.)
- Let
the adhesive cure and reinstall the battery clamp if you removed it. You may want to complete the
installation by using a wire tie to attach the sensor harness wire to the
heavy positive wire.
- EnterĀ your saved radio station settings.